在完成用户模块时,需要用户上传头像,文件上传功能毕竟属于开发过程中重要的模块,也是出现漏洞较多的点,所以写起来十分小心,并记录下。
在用户注册的时候,平台会自动生成一张图片作为用户的头像,后续用户可以自己上传自己喜欢的头像。
0x01 用户头像随机生成
平台头像仿Github初始的头像,回生成随机的头像,具体代码如下,网上应该也有源代码
1 | # -*- coding: UTF-8 -*- |
2 | __author__ = 'Joynice' |
3 | import random, math |
4 | import numpy as np |
5 | import cv2 |
6 | |
7 | class GithubAvatarGenerator: |
8 | ''' |
9 | Github default avatar is a 420*420 image contains 5*5 block vertex. |
10 | Each block is a 70*70 square. |
11 | The width of the frame around block vertex is 35px. |
12 | This is an example avatar. |
13 | https://raw.githubusercontent.com/josephzxy/pic/master/example_github_avatar.png |
14 | This class aims at generating a github-avatar-like avatars. |
15 | Usage: |
16 | - Initialize this class |
17 | - Call get_randowm_avatar() |
18 | ''' |
19 | |
20 | avatar_width = 420 # the length of line of the avatar |
21 | block_vertex_dimension = 5 # the dimension of block vertex |
22 | block_width = 70 # the length of line of block |
23 | background_color = [230, 230, 230] # the brackground color |
24 | frame_width = 35 # the width of frame surrounding block vertex |
25 | # some color that might be approiprate for the color of block. |
26 | color_pool_rgb = ( |
27 | (170, 205, 102), |
28 | (159, 255, 84), |
29 | (209, 206, 0), |
30 | (255, 255, 0), |
31 | (47, 107, 85), |
32 | (47, 255, 173), |
33 | (0, 173, 205), |
34 | (8, 101, 139), |
35 | (180, 180, 238), |
36 | (106, 106, 255), |
37 | (155, 211, 255), |
38 | (204, 50, 153), |
39 | (101, 119, 139) |
40 | ) |
41 | |
42 | def _get_avatar_vertex(self): |
43 | ''' |
44 | Generate a vertex of which each value is a boolean value. |
45 | This 5*5 vertex denotes the strcture of 5*5 block vertex in github avatar |
46 | ''' |
47 | # get 5*5 2d array full of False |
48 | avatar_vertex = np.empty((self.block_vertex_dimension, self.block_vertex_dimension), dtype=np.bool) |
49 | |
50 | for row in avatar_vertex: |
51 | for i in range(math.ceil(self.block_vertex_dimension / 2)): |
52 | row[i] = True if random.randint(0, 1) == 1 else False |
53 | # copy left half to right half |
54 | for row in avatar_vertex: |
55 | for i in range(math.floor(self.block_vertex_dimension / 2)): |
56 | row[self.block_vertex_dimension - 1 - i] = row[i] |
57 | |
58 | return avatar_vertex |
59 | |
60 | def _get_avatar_data(self): |
61 | ''' |
62 | Generate a 3d array contains color info in each pixel in the avatar |
63 | ''' |
64 | # fill the whole img with the background |
65 | avatar_data = np.zeros((self.avatar_width, self.avatar_width, 3), dtype=np.uint8) |
66 | avatar_data[:][:] = self.background_color |
67 | |
68 | rand_color_index = random.randint(0, len(self.color_pool_rgb)) |
69 | rand_color = self.color_pool_rgb[rand_color_index] |
70 | |
71 | avatar_vertex = self._get_avatar_vertex() |
72 | |
73 | # add blocks according to avatar vertex |
74 | for i in range(len(avatar_vertex)): |
75 | for j in range(len(avatar_vertex[i])): |
76 | is_True = avatar_vertex[i][j] |
77 | if is_True: |
78 | up_left_point = (self.frame_width + i * self.block_width, self.frame_width + j * self.block_width) |
79 | for k in range(self.block_width): |
80 | for l in range(self.block_width): |
81 | lvl1 = k + up_left_point[0] |
82 | lvl2 = l + up_left_point[1] |
83 | avatar_data[lvl1][lvl2] = rand_color |
84 | else: |
85 | continue |
86 | |
87 | return avatar_data |
88 | |
89 | def get_random_avatar(self): |
90 | img = self._get_avatar_data() |
91 | cv2.imshow('My pic', img) |
92 | cv2.waitKey() |
93 | |
94 | def save_avatar(self, filepath): |
95 | img = self._get_avatar_data() |
96 | cv2.imwrite(filepath, img) |
97 | |
98 | if __name__ == '__main__': |
99 | gen = GithubAvatarGenerator() #初始化类 |
100 | gen.save_avatar(filepath='../static/cms/img/user/111.png') #保存路径 |
0x02 平台头像绑定用户
有头像了,下面就要在用户注册的时候,生成随机头像绑定用户,这里在数据库中有个avatar_path字段用来保存头像存储路径,路径要存相对路径或者使用os.path.dirname(os.path.abspath(__file__))获取项目路径,然后进行路径拼接。头像命名的话,我这里使用用户邮箱进行命名。
1 | |
2 | |
3 | |
4 | def create_cms_user(username, password, email): |
5 | avatar = GithubAvatarGenerator() #chu初始化类 |
6 | path = '../static/cms/img/user/'+ email +'.png' |
7 | avatar.save_avatar(filepath='./static/cms/img/user/'+ email +'.png') #头像保存本地 |
8 | user = User(username=username, password=password, email=email, avatar_path=path) #创建用户 |
9 | db.session.add(user) #添加 |
10 | db.session.commit() #提交 |
11 | print('用户添加成功') |
0x03 用户修改头像
用户修改头像的话,有几个注意点:
- 用户头像图片类型(png、jpg等常规图片类型检查)
- 用户上传头像大小限制
- 用户上传完图片后,重命名保存(防止图片马)
前端图片上传的话使用过两个插件,fileinput和Layui中的图片上传功能,其基本实现都差不多,fileinput这个插件好久没用了,这个插件基于bootstrap,需要导入相关依赖,所有这里用Layui做演示,支持国产,但不得不说“坑”有点多。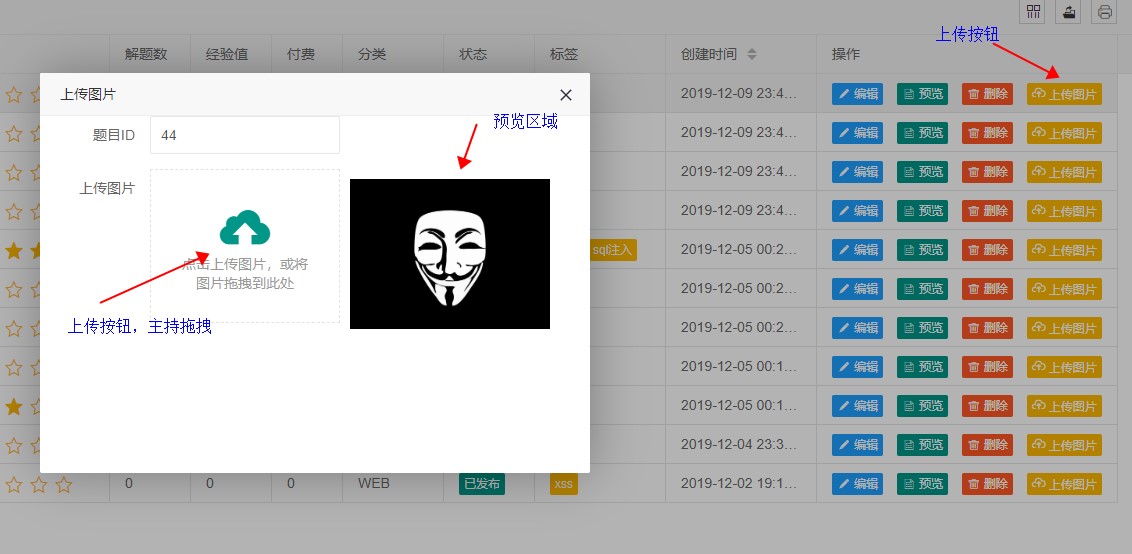
实现如图的功能,具体弹窗、表单就不说了,主要记录图片上传功能,这个功能主要是给每个题目上传一个背景图,同时具有修改背景图的功能。非常类似用户修改头像。
- html
html代码中用到Layui的form,代码如下:
1 | <form class="layui-form" action="" lay-filter="example2" id="upload_img" style="display: none"> |
2 | <div class="layui-form-item"> |
3 | <label class="layui-form-label">题目ID</label> |
4 | <div class="layui-input-inline"> |
5 | <input type="number" name="id" lay-verify="required" autocomplete="off" placeholder="请输入题目ID" class="layui-input" disabled> |
6 | </div> |
7 | </div> |
8 | <div class="layui-form-item"> |
9 | <label class="layui-form-label">上传图片</label> |
10 | <div class="layui-input-inline uploadHeadImage"> |
11 | <div class="layui-upload-drag" id="headImg"> |
12 | <i class="layui-icon"></i> |
13 | <p>点击上传图片,或将图片拖拽到此处</p> |
14 | </div> |
15 | </div> |
16 | <div class="layui-input-inline"> |
17 | <div class="layui-upload-list"> |
18 | <img class="layui-upload-img headImage" id="demo1" width="200" height="150"> |
19 | <p id="demoText"></p> |
20 | </div> |
21 | </div> |
22 | </div> |
23 | </form> |
html中在第二个layui-form-item设置图片上传,同时form样式设置display:none配合Layui的弹出层使用。
- js
js代码中实现文件上传,Layui图片上传插件自带文件格式判断、大小限制以及预览功能。
1 | var uploadInst = upload.render({ |
2 | elem: '#headImg' //绑定元素 |
3 | , url: 'xxxx' //上传接口 |
4 | , method: 'post' //方法 |
5 | , headers: {'X-CSRF-TOKEN': token} //设置csrf-token |
6 | , size: 1024 * 10 //前端限制文件大小,这里为10m |
7 | , accept: 'images' //接受文件类型,这里为图片 |
8 | , data: { |
9 | 'id': data.id, |
10 | } //同时传递题目ID |
11 | , before: function (obj) { |
12 | //预读本地文件示例,不支持ie8 |
13 | obj.preview(function (index, file, result) { |
14 | $('#demo1').attr('src', result); //图片链接(base64) |
15 | }); |
16 | } |
17 | , done: function (res) { |
18 | //上传完毕回调 |
19 | if (res.code === 0) { |
20 | table.reload('LAY-app-content-list'); //表格重载 |
21 | layer.msg(res.message); |
22 | layer.closeAll('page'); //关闭弹窗 |
23 | } else { |
24 | return layer.msg(res.message); |
25 | } |
26 | } |
27 | , error: function () { |
28 | //请求异常回调 |
29 | var demoText = $('#demoText'); |
30 | demoText.html('<span style="color: #FF5722;">上传失败</span> <a class="layui-btn layui-btn-mini demo-reload">重试</a>'); |
31 | demoText.find('.demo-reload').on('click', function () { |
32 | uploadInst.upload(); |
33 | }); |
34 | } |
35 | }); |
虽然使用这个插件非常方便,但是实现这个功能还是遇到很多的坑,这里记录我解决的一个坑
上传第一个图片正常,但是上传第二个文件的时候无反应
原因: 在上传完,第一个图片后,上传html代码中会绑定一些元素,如果页面没有刷新的话,在进行下面的上传,会出现无反应的现象。
解决办法:在弹窗层销毁后,将元素重置。
1 | end: function () { |
2 | $('.uploadHeadImage').empty().append(" <div class=\"layui-upload-drag\" id=\"headImg\">\n" + |
3 | " <i class=\"layui-icon\"></i>\n" + |
4 | " <p>点击上传图片,或将图片拖拽到此处</p>\n" + |
5 | " </div>"); |
6 | } |
- 后端
后端的话,没有添加文件大小检测,其他都实现了
1 | def post(self): |
2 | file = request.files['file'] #获取文件 |
3 | id = request.form.get('id') #获取id |
4 | if not id: |
5 | return field.params_error(message='参数缺失') |
6 | if file and allowed_file(file.filename, ALLOWED_EXTENSIONS=config.ALLOWED_PIC_EXTENSIONS): #文件类型判断 |
7 | filename = secure_filename(file.filename) |
8 | new_name = tools.rename(filename) #重命名 |
9 | new_path = os.path.join(config.UPLOAD_PIC_PATH, tools.rename(filename)) |
10 | file.save(new_path) #保存文件 |
11 | vul = Vuls.query.get(id) |
12 | if not vul: |
13 | return field.params_error(message='题目不存在') |
14 | old_path = os.path.join(config.UPLOAD_PIC_PATH, vul.img) |
15 | if vul.img: |
16 | if os.path.exists(old_path): |
17 | os.remove(old_path) #删除上一个头像 |
18 | vul.img = new_name |
19 | db.session.commit() |
20 | return field.layui_success(message='上传成功') |
21 | return field.params_error(message='文件类型错误') |
此片文章记录了Flask实现文件上传的全过程,以供以后学习查看。